Drawing Text
Perhaps the easiest way to draw text is to use a bitmap font. Bitmap fonts are images where the characters are drawn in a regular grid.

Because every character has the same size it is easy to load the bitmap image into an atlas and use it to draw sprites for each character. Drawing text with bitmap fonts is also straightforward because the characters can just be placed next to each other using the distance they have on the bitmap image to guide placement. Below is some text rendered with a bitmap font.

Bitmap fonts go very well in retro looking games since they where heavily used in older games and they are often drawn in blocky, pixelated styles, like our example above, to emphasize this aesthetic. Nothing stops us from rendering high fidelity font characters in our bitmap image but the fact remains that characters have fixed, equidistant placement from each other so we can only render monospaced fonts with this approach.
In more modern text rendering, characters have variable spacing. This makes storing and rendering the font slightly more difficult. There are many font formats available, but perhaps the more ubiquitous is Truetype font (TTF). Truetype is a format in which fonts are stored as vectors. The specifics of the font implementation are not of much concern to us because we will be rendering the font to an atlas from which we will create sprites. What is important is the way the character sprites are placed. In TTF fonts, each character has a different bounding box and metrics that define how it is placed. For example, the letter Q in the following example sits partially under the baseline and we must account for that when rendering it.
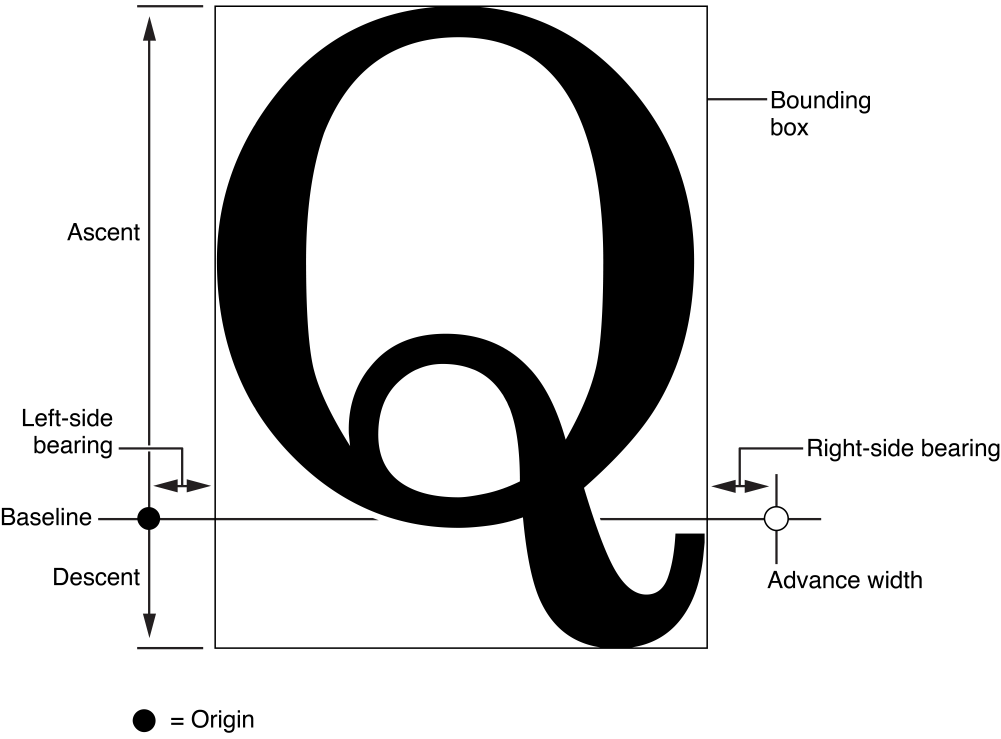
By implementing TTF rendering our users can make use of the numerous TTF fonts available1. Below is text rendered using the Open Sans font.

Font Interface
We are supporting bitmap and TTF fonts and each will have their own
implementation. We will define a Font interface that will
make it easy to use either font type interchangeably.
// Font is the common interface for bitmap and ttf fonts
type Font interface {
    // Get the image representation of the font
    Image() *image.RGBA
    // Get render information for a rune
    RuneMetrics(r rune) RuneMetrics
    // Get font information
    FontMetrics()
}
The Image function returns the image onto which our font
is rendered. This will be used to turn the font image into an atlas. The
RuneMetrics function returns information about a specific
rune.
type RuneMetrics struct {
    boundingBox math.Box2D[int] //glyph fits inside this
    adjust      math.Vector2[int]
    advance     int
}
This information will help us when placing individual sprites for
each character and corresponds to the information shown in the TTF font
diagram above. The bounding box tells us the location of this character
in the font image. The adjust variable holds the distance
from the origin to the bottom-left corner of the bounding box. We use it
to properly place the character when rendering so that it appears at the
correct position. The advance variable tells us how much to
move the draw location after each character.
Finally, the FontMetrics function returns information
about the whole font: the font size and the distance between lines:
type FontMetrics struct {
    Size     int
    YAdvance int
}
Bitmap Font Implementation
We start with the implementation of a bitmap font as it is the easiest.
type BitmapFont struct {
    image          *image.RGBA       // image containing the glyphs of this font
    runeDimensions math.Vector2[int] // width and height of each rune
    rows, columns  int               // how many glyphs per row and column in the image

    // characters in this bitmap image, the order of this array matches
    // the order in the image (left to right, top to bot)
    runes []rune
}
BitmapFont holds the bitmap image, and how many rows and
columns it has as well as information about the characters in the image.
In Go talk, characters in the data (UTF) sense are called runes and we
will be going with that as well. A glyph is the visual representation of
a rune. Notice that we don’t need information for each rune because all
of them are identical (this will not be the case for TTF fonts).
Finally, we store the runes for which we have glyphs. Go uses utf
encoding for which there are thousands of glyphs. Our bitmap image will
only hold a small subset (possibly the printable ASCII characters) so we
need to store the subset of characters that we have and we do that in
the runes array. For convenience the characters in this
array match the order that the characters appear on the bitmap image.
For the example bitmap in the begining of the tutorial the characters
would be stored in this order:
!\"#$%&'()*+,-./0123456789:;<=>?@ABCDEFGHIJKLMNOPQRSTUVWXYZ[\]^_ `abcdefghijklmnopqrstuvwxyz{|}~To create a bitmap font we need the bitmap image, the number of rows and columns it has and the runes stored within. We expect the user to pass the runes with the correct order as explained above.
func NewBitmapFont(imageFile string, rows, columns int, runes []rune) (*BitmapFont, error) {
    var err error

    bitmap := BitmapFont{
        rows:    rows,
        columns: columns,
        runes:   runes,
    }

    if bitmap.image, err = imageutil.RgbaFromFile(imageFile); err != nil {
        return &bitmap, err
    }

    imgSize := bitmap.image.Rect.Size()
    bitmap.runeDimensions = bitmapRuneDimensions(math.Vector2[int]{imgSize.X, imgSize.Y}, rows, columns)
    return &bitmap, nil
}
Our constructor loads the image, fills in the row, column and rune information and then calculates the rune dimensions by dividing the image dimensions with the number of rows/columns.
func bitmapRuneDimensions(imageDimensions math.Vector2[int], rows, columns int) math.Vector2[int] {
    return math.Vector2[int]{
        X: imageDimensions.X / columns,
        Y: imageDimensions.Y / rows,
    }
}
This assumes that the bitmap image does not have any borders on the perimeter of the image or around the glyphs themselves.
For BitmapFont to satisfy the Fontinterface
we must provide implementations for Image,
RuneMetrics and FontMentrics functions.
Image is trivial, we just return the stored bitmap
image:
func (b *BitmapFont) Image() *image.RGBA {
    return b.image
}
RuneMetrics is also pretty simple since all runes have
the same metrics. The adjust parameter is not initialized
so it becomes a zero vector. This means the glyphs are placed at the
origin of their bounding box which is what we want for bitmap fonts
where the placement is baked in the glyph itself.
func (b *BitmapFont) RuneMetrics(r rune) RuneMetrics {
    bb, _ := b.GetRuneBounds(r)
    return RuneMetrics{
        boundingBox: bb,
        advance:     b.runeDimensions.X,
    }
}
We do need to calculate the glyph bounding box which we do with the
GetRuneBounds method. The method goes through the
runesarray and finds the index of the requested rune. We
assume the glyphs in the image are in the same order so we can use the
index to calculate the bounding box.
func (b *BitmapFont) GetRuneBounds(r rune) (math.Box2D[int], error) {
    bb := math.Box2D[int]{}
    index := 0
    for index = range b.runes {
        if b.runes[index] == r {
            break
        }
    }

    if index == len(b.runes) {
        return math.Box2D[int]{}, errors.New("Rune not found in bitmap")
    }

    // this assumes the index matches the order in the image
    y := index/b.columns + 1 // +1 is to move the origin to the bottom left instead to upper right
    x := index % b.columns
    rd := b.runeDimensions
    bb = bb.New(x*rd.X, y*rd.Y, (x+1)*rd.X, (y-1)*rd.Y)

    return bb, nil
}
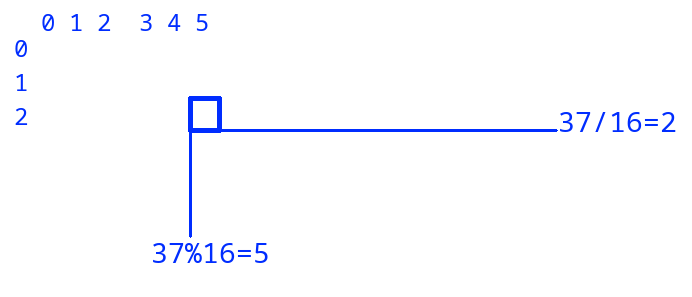
Because all glyphs have the same dimensions and the number of rows and columns in the image is known, we can calculate the x and y location of the bounding box with the modulo and division operators. Take rune ‘F’ as an example. Its index in the runes array is 37 and its position in the bitmap image is row 2 and column 5 (zero indexed). The integer division operation tells us the row for a specific index and the modulo operator gives us the column. The image origin is at the top left corner so we add one to the y index to move it to the bottom right so that it matches the convention used in the rest of AGL code.
TrueType Font Implementation
Similarly to bitmap, TrueTypeFont holds an image onto
which we have rendered glyphs. We also store the runes for which we have
glyphs in an array (runes) and global font metrics
(fontMetrics). Unlike bitmap, for TTF we want per-rune
information about our glyphs and we store that in
runeMetrics.
type TrueTypeFont struct {
    image       *image.RGBA   // image containing the glyphs of this font
    runes       []rune        // runes(characters,symbols) stored in this font
    runeMetrics []RuneMetrics // render information for each rune (matches order of runes)
    fontMetrics FontMetrics
}
Building a TTF font requires that we load a font file, typically
ending in .ttf, using the freetype library.
This library lets us load the font and renders images of individual
runes. This is done with the following code (error checking is
omitted):
fontBytes, err := os.ReadFile(fontFile)
font, err := truetype.Parse(fontBytes)
face := truetype.NewFace(font, &truetype.Options{
    Size:    fontSize,
    Hinting: font.HintingFull,
})
The font file is read from storage and then parsed using the truetype
library. This creates a font out of which we can create a font face. A
font face is a font rendered at a specific size. So
Open Sans 32 is face of the Open Sans font.
Our TTF constructor builds a font face of a specific size (given by the
user) and renders the glyphs that the user requests into an image.
func NewTrueTypeFont(fontFile string, fontSize float64, runes []rune) (*TrueTypeFont, error) {
    imageSize := math.Vector2[int]{1024, 1024}
    ttf := &TrueTypeFont{
        image:       image.NewRGBA(image.Rect(0, 0, imageSize.X, imageSize.Y)),
        runes:       runes,
        fontMetrics: FontMetrics{Size: int(fontSize)},
    }

    fontBytes, err := os.ReadFile(fontFile)
    f, err := truetype.Parse(fontBytes)
    face := truetype.NewFace(f, &truetype.Options{
        Size:    fontSize,
        Hinting: font.HintingFull,
    })

    // drawing point
    yAdvance := face.Metrics().Ascent.Ceil()
    ttf.fontMetrics.YAdvance = yAdvance
    dot := fixed.P(0, yAdvance)

    for _, r := range runes {
        rec, mask, maskp, adv, ok := face.Glyph(dot, r)
        draw.Draw(ttf.image, rec, mask, maskp, draw.Src)

        bbox := math.Box2D[int]{}.FromImageRect(rec)
        bbox.MakeCanonical()
        dotvec := fixedPointToVec(dot)
        ttf.runeMetrics = append(ttf.runeMetrics, RuneMetrics{
            boundingBox: bbox,
            advance:     adv.Ceil(),
            adjust:      bbox.P3().Sub(dotvec),
        })

        dot.X += adv
        if dot.X+adv > fixed.I(imageSize.X) {
            dot.X, dot.Y = 0, dot.Y+fixed.I(yAdvance)
        }
    }
    return ttf, nil
}
In the above, the font struct is initialized2 and the font is loaded as described above. We then loop over the runes given by the user and render them onto the image. This snippet gets the pixel info for a rune and copies (renders) it to the image:
rec, mask, maskp, adv, ok := face.Glyph(dot, r)
draw.Draw(ttf.image, rec, mask, maskp, draw.Src)
The rune is rendered at the location given by dot which
is initially set to the top-left of the image. After we render a rune
the dot is moved to the right by adv pixels which is the
rune’s Advance width metric. If the dot goes over the image
width we reset it’s X position to zero and move it one line below.
While rendering, we also store per-rune info. The runes bounding box
is conveniently provided by the face.Glyph method (it
combines the glyph’s internal bounding box with dot).
Advance also comes directly from face.Glyph as it is a metric used in
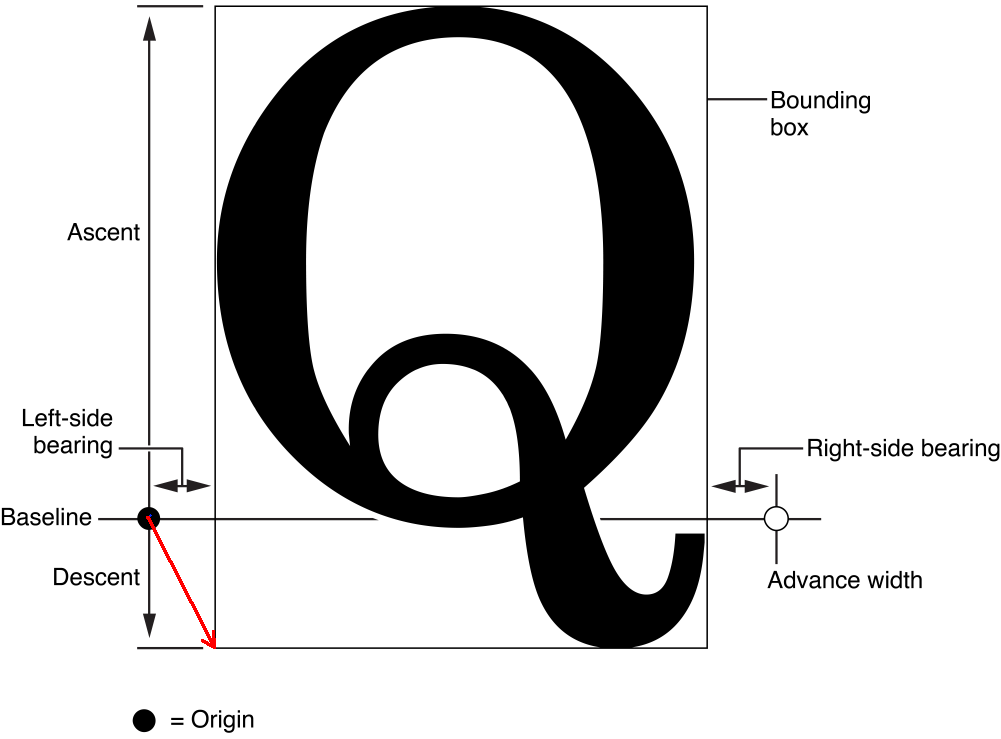
the font itself. For the adjust parameter we subtract the
dot and the corner of the bounding box. This creates the
vector in red seen below and is enough to let us properly place the
glyph when we render.
With the constructor done the rest of the implementation is
straightforward. The methods needed to implement Font just
return the info we saved in the constructor.
func (t *TrueTypeFont) Image() *image.RGBA {
    return t.image
}

func (t *TrueTypeFont) FontMetrics() FontMetrics {
    return t.fontMetrics
}

func (t *TrueTypeFont) RuneMetrics(r rune) RuneMetrics {
    i := 0
    for i = range t.runes {
        if t.runes[i] == r {
            break
        }
    }
    if i == len(t.runeMetrics) {
        return RuneMetrics{}
    }
    return t.runeMetrics[i]
}
Rendering
We will provide a method to render text on an image. This is not particularly useful for games as we usually want our text to be sprites that we can move around but it is useful in some cases, for example when we want a big chunk of text, like a letter, to be rendered into a single sprite. It also serves as a nice way to test what we have built.
Our render function accepts an image, a Font and a
string with the text that we want rendered. We must also provide a
bounding box to restrict the text to be rendered whithin a specific
region of the image.
func Render(target *image.RGBA, bounds math.Box2D[int], text string, font Font) {
    bounds.CropToFitIn(math.Box2D[int]{}.FromImageRect(target.Rect))
    yAdvance := font.FontMetrics().YAdvance
    startingMargin := math.Vector2[int]{X: 0, Y: yAdvance}
    start := bounds.P1.Add(startingMargin)
    fmt.Println(start, startingMargin)
    dot := start

    for _, r := range text {
        rm := font.RuneMetrics(r)
        runeBB := rm.boundingBox
        adjustedDot := dot.Add(rm.adjust)
        if (adjustedDot.X+runeBB.Size().X) >= bounds.P2.X || r == '\n' {
            dot.X = start.X
            dot.Y += yAdvance
            adjustedDot = dot.Add(rm.adjust)
        }
        if r == '\n' {
            continue
        }
        if adjustedDot.Y > bounds.P2.Y {
            return
        }

        destBB := math.Box2D[int]{}.New(adjustedDot.X, adjustedDot.Y,
            adjustedDot.X+runeBB.Size().X, adjustedDot.Y-runeBB.Size().Y)
        draw.Draw(target, destBB.ToImageRect(), font.Image(), runeBB.ToImageRect().Min, draw.Src)
        dot = dot.Add(math.Vector2[int]{X: rm.advance, Y: 0})
    }
}
Rendering the text is similar to how we created the TTF font. We
initialize a dot position at the top-left of our bounding box. We then
iterate rune-by-rune through the provided text. For each rune we grab
it’s bounding box using the Font.RuneMetrics method. We
figure out the render location by adding the rune’s bounding box, the
current draw location (dot) and the rune’s adjust vector.
We then copy the pixel values from this location to our target image
using the draw.Draw method. If we go over the right edge of
our bounding box we reset to the left and one line below. We do the same
if a newline is encountered.
Using Render we can now draw text using both bitmap and
TTF fonts. In this example we draw two pieces of text on the same image
using different fonts.
charList := "!\"#$%&'()*+,-./0123456789:;<=>?@ABCDEFGHIJKLMNOPQRSTUVWXYZ[\\]^_ `abcdefghijklmnopqrstuvwxyz{|}~�"
bitmapFont, err := NewBitmapFont("data/bitmap.png", 6, 16, []rune(charList))
ttfFont, err := NewTrueTypeFont("data/OpenSans-Regular.ttf", 38, CharacterSetASCII())

img := image.NewRGBA(image.Rect(0, 0, 500, 200))

box := math.Box2D[int]{}.New(0, 0, 500, 100)
Render(img, box, "Bitmap is cool and retro... ", bitmapFont)

box = math.Box2D[int]{}.New(0, 100, 500, 200)
Render(img, box, "But ttf is nice and smooth!", ttfFont)
It produces the following:

Drawing Text using Sprites
To draw text in-game we will create sprites for character glyphs and
draw them like we do with any sprite. To do this we must first load our
font image into an atlas. We do this using the FontToAtlas
utility function:
func FontToAtlas(font Font, atlas *sprite.Atlas) ([]rune, []int, error) {
    runes := font.Runes()
    boundingBoxes := []math.Box2D[int]{}
    for _, r := range runes {
        metrics := font.RuneMetrics(r)
        metrics.BoundingBox.MakeCanonical()
        boundingBoxes = append(boundingBoxes, metrics.BoundingBox)
    }

    _, ids, err := atlas.AddAtlasImage(font.Image(), boundingBoxes)
    if err != nil {
        return nil, nil, err
    }
    return runes, ids, nil
}
The function goes over every rune in the font and gets its bounding
box. Then the font image and the list of bounding boxes are added to the
atlas. This creates sprite ids for every rune. We return
the list of runes and the list of sprite ids whose indices match. So if
runes is a b c and ids is 12 13 14, creating a
sprite with id=12 would draw ‘a’.
We don’t want to burden our users with having to place individual
character sprites in order to draw text so we provide a character
drawing component called Text which lives in the agl/game
package. Text stores a text.Font and draws a
text string by creating individual sprites for every rune in the string.
A bounding box lets us constrain the text into a specific region.
type Text struct {
    bb              math.Box2D[int]
    sprites         []sprite.Sprite
    spritePositions []math.Vector2[float32]
    font            text.Font
    text            string
    runeSpriteMap   *RuneToSpriteMap
    atlas           *sprite.Atlas
    shader          *shaders.Shader
    renderOrder     int
}
The Font constructor simply stores the required
dependencies passed as parameters.
func NewText(text string, font text.Font, boundingBox math.Box2D[int], runeSpriteMap *RuneToSpriteMap,
    atlas *sprite.Atlas, shader *shaders.Shader, renderOrder int) *Text {
    t := Text{
        bb:            boundingBox,
        runeSpriteMap: runeSpriteMap,
        atlas:         atlas,
        shader:        shader,
        renderOrder:   renderOrder,
        font:          font,
    }
    t.SetText(text)
    return &t
}
The main method of interest is SetText which creates and
arranges the sprites used to show text.
func (t *Text) SetText(text string) {
    // clear existing
    t.sprites = []sprite.Sprite{}
    t.spritePositions = []math.Vector2[float32]{}

    yAdvance := t.font.FontMetrics().YAdvance
    dot := t.bb.P3().Sub(math.Vector2[int]{0, yAdvance})
    for i, r := range []rune(text) {
        spriteId := t.runeSpriteMap.Get(r)
        if spriteId < 0 {
            continue
        }
        metrics := t.font.RuneMetrics(r)
        spr, _ := sprite.NewSprite(spriteId, t.atlas, t.shader, t.renderOrder)
        spr.SetScale(math.Vector2ConvertType[int, float32](metrics.BoundingBox.Size()))
        t.sprites = append(t.sprites, spr)
        spritePos := math.Vector2ConvertType[int, float32](dot)
        fAdjust := math.Vector2ConvertType[int, float32](metrics.Adjust)
        t.spritePositions = append(t.spritePositions, spritePos.Add(fAdjust))
        dot = dot.Add(math.Vector2[int]{X: metrics.Advance, Y: 0})
        if i < len(text)-1 {
            nextRune := text[i+1]
            nextAdvance := t.font.RuneMetrics(rune(nextRune)).Advance
            if dot.X+nextAdvance >= t.bb.Size().X {
                dot.X = 0
                dot.Y -= yAdvance
            }
        }
    }
}
SetText is similar in concept with the render function
we saw earlier. It loops through the text and creates sprites for every
rune. Like render, it uses a dot variable to keep track of
the current location in which to place a sprite. The dot is moved from
left to right by each rune’s Advance metric. When the end
of the line is reached, we reset to the left and move one line below.
Each sprite is placed at the dot location after being adjusted by
RuneMetrics.Adjust. The sprite’s scale is set to match the
size on the atlas.
Notice that we don’t set the sprite position. Instead, we save it in
a separate array, spritePositions. This is because the
positions calculated here are relative to the origin of the
Text bounding box. Text is a component that
must be placed inside a game object. The final position of rendered text
is given by the game object position and spritePositions.
This is done in Update.
func (t *Text) Update(dt time.Duration, parent GameObject) {
    for i := range t.sprites {
        t.sprites[i].SetPosition(parent.GetTranslation().Add(t.spritePositions[i].AddZ(0)))
        t.sprites[i].SetScale(parent.GetScale().Mul(t.sprites[i].GetScale()))
        t.sprites[i].SetRotation(parent.GetRotation())
    }
}
By keeping relative sprite positions in their own array we can move
the text without having to loop over the whole text every time. If the
parent moves the text moves with it. The costly SetText
loop only needs to be called if the text changes.
In the above code we get the sprite associated with a rune
r using runeSpriteMap.Get(r). This is a
convenience type that holds the rune and sprite arrays given by
FontToAtlas. It’s Get method searches the
Runes array and returns the same index in the
Sprites array, with the assumption that two arrays are
properly matched (FontToAtlas arrays will be).
// Holds runes and their corresponding sprite ids in two arrays whose indexes match.
type RuneToSpriteMap struct {
    Runes   []rune
    Sprites []int
}

func NewRuneToSpriteMap(runes []rune, sprites []int) *RuneToSpriteMap {
    m := RuneToSpriteMap{
        Runes:   make([]rune, len(runes)),
        Sprites: make([]int, len(sprites)),
    }
    copy(m.Runes, runes)
    copy(m.Sprites, sprites)
    return &m
}

// Get sprite for this rune
func (rm *RuneToSpriteMap) Get(r rune) int {
    for i := range rm.Runes {
        if rm.Runes[i] == r {
            return rm.Sprites[i]
        }
    }
    return -1
}
The only thing of interest here is the Get function
which can potentially be optimized to return in one operation instead of
looping if we know beforehand that our runes are arranged in a specific
way. For example, if we know that the Runes array holds the
lowercase characters “abcdef…” we can modify Get like
this:
func (rm *RuneToSpriteMap) SpecialGet(r rune) int {
    return rm.Sprites[r-int('a')]
}
This type of optimization is not currently implemented.
Adding Text to Knight vs Trolls
In the latest iteration of Knight vs Trolls our knight must collect coins that spawn on the ground and avoid sculls that deduct from their score. So far the score was printed in the console so lets make is show up in-game.
We will first create a game object to hold our text component.
type FloatText struct {
    text     game.Text
    position math.Vector3[float32]
    game.GameObjectCommon
}
It’s constructor takes care of loading a font, if one has not been loaded already.
var fontLoaded bool
var runeToSpriteMap *game.RuneToSpriteMap
var font text.Font

func NewFloatText(t string, size math.Vector2[int], position math.Vector3[float32]) *FloatText {
    if !fontLoaded {
        charList := "!\"#$%&'()*+,-./0123456789:;<=>?@ABCDEFGHIJKLMNOPQRSTUVWXYZ[\\]^_ `abcdefghijklmnopqrstuvwxyz{|}~�"
        font, err = text.NewBitmapFont("data/bitmap.png", 6, 16, []rune(charList))
        runes, sprites, err := text.FontToAtlas(font, Game.Atlas)
        runeToSpriteMap = game.NewRuneToSpriteMap(runes, sprites)
        fontLoaded = true
    }

    ft := FloatText{
        text:     *game.NewText(t, font, math.NewBox2D(0, 0, size.X, size.Y),
                  runeToSpriteMap, Game.Atlas, &Game.Shader, 3),
        position: position,
    }

    ft.SetScale(math.Vector2[float32]{1, 1})
    return &ft
}
The rest of the object is very simple. It’s Update sets
the transform and calls Text.Update and Render
simply calls Text.Render.
func (f *FloatText) Update(dt time.Duration) {
    parentPos := f.GetParent().GetTranslation()
    pos := parentPos.Add(f.position)
    f.SetTranslation(pos)
    f.text.Update(dt, f)
}

func (f *FloatText) Render(r *sprite.Renderer) {
    f.text.Render(r)
}
We also provide a pass-through method for setting updating the text.
func (f *FloatText) SetText(text string) {
    f.text.SetText(text)
}
To render text we add a FloatText object to our scene.
We give it a wide bounding box and set its position near the top of the
screen. We make this object a global so that the knight can access it
easily.
var ScoreText *FloatText

func NewLevel() *game.Scene {
    scene := game.Scene{}
    scene.AddGameObject(NewKnight(math.Vector2[float32]{100, 100}))
    scene.AddGameObject(NewCoin(math.Vector2[float32]{190, 190}))
    // New
    ScoreText = NewFloatText("Score: 0", math.Vector2[int]{300, 50}, math.Vector3[float32]{20, 460, 5})
    scene.AddGameObject(ScoreText)
    //
    return &scene
}
In our knight’s update function, whenever we collide with a coin or
scull we update the score. At the same time we update the
ScoreText object.
func (k *Knight) Update(dt time.Duration) {
    //...
    collisions := k.bbox.CheckForCollisions()
    for i := range collisions {
        if game.HasTag(collisions[i], TagDebuff) {
            k.coins--
        } else {
            k.coins++
        }
        ScoreText.SetText(fmt.Sprint("Score:", k.coins))
        collisions[i].Destroy()
    }
    //...
}FloatText can also be added as a child of another game
object. We can, for example, add a name tag to our player:
func NewKnight(position math.Vector2[float32]) *Knight {
    //...
    knight.textBox = NewFloatText("Lancy", math.Vector2[int]{200, 20}, math.Vector3[float32]{-60, 40, 5})
    knight.AddChild(knight.textBox)
}A good task for the reader would be to make a +1 appear
on the knight’s head every time the grab a coin. It should move up a bit
and disappear after half a second. With sculls, it should show a
-1 going down for half a second.
Closing Remarks
In this tutorial we created a versatile method for drawing text that
can utilize bitmap and TTF fonts and showed how we can render text
sprites in our games. One limitation is that the sprite placement
method, SetText, is very basic. It renders text
left-to-right with no support for standard text placement options such
as alignment (e.g centered text) and doesn’t deal with whitespace
(tabs/newlines). For a text heavy game or for drawing complex UIs this
would be a limitation and we may add this functionality in the
future.
See for example https://fonts.google.com/.↩︎
We initialize the font image to a fixed size for simplicity but the size can be better estimated from the number of runes passed.↩︎